It’s almost a new year, so it’s a perfect time for a new hair color and style. If you’re looking to add some highlights and achieve a nice rod set, keep reading! This amazing highlight and rod set technique, is brought to you by DJEA Natural Hair Salon Spa.
What you’ll need:
- Shampoo
- Conditioner
- Highlighting foil
- Pulp Riot lightener (if you have dark hair)
- Pulp riot Semi-permanent hair color
- Styling products and tools
- Hooded dryer or blow dryer
If you’re going to add color to your hair, you want the color to be as popping as possible,
and that all begins with washing your hair. Color will take better, on clean hair, so make sure you give your hair a really good wash. As you shampoo, gently finger detangle your hair. Continue to detangle as you wash out the shampoo and work in the conditioner.
As you move on to the next step, don’t wash out the conditioner. Leave the conditioner in to use it as protection while the color is added. It’s ok if your hair is a little damp, but if it’s too wet, lightly towel dry it. If your hair still needs to be detangled, grab a detangling brush and gently finish detangling.
Now time for the exciting part, the color! If your hair is dark, you will first need to lift (or lighten) your hair, which will allow the color to show up better.
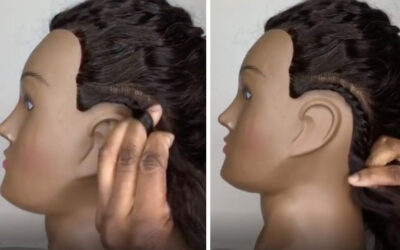
To add the lifter, you’ll need your hair foil, a comb, and of course the lifter itself. Take the hair in small sections, grab your foil and place it underneath the hair, brush the lightner onto the hair. Think about how you want the final style to look, how do you want the hair to lay, and subsequently, how will the highlights flow. This will determine how you brush the lightener on top of your hair.
Once you have added the lightener to all of the sections you plan to dye, rinse all of the lightner out of your hair, and add your color! Add it to whichever parts of your hair you want to be colored, and let it sit for about 30 minutes. When you rinse out the dye, make sure to do it with cool, low temp water. This allows the cuticles to close.
You’re one step closer to a popping new look! It’s time to style. Keep in mind that hair is very fragile after being colored, so it’s important that you moisturize your hair. Use products that are tried and true. The last thing you want is to have your style not come out the way you want, because you tested something new.
Section out your hair and start with a leave-in conditioner. A leave-in will both moisturize your hair, and help balance the PH level of your hair. Once you’ve worked the leave-in into your hair, add a moisturizing cream, and finally a mousse or foam like the Design Essentials Foam Composition used here.
If you’re using the same brand for all of your products, you should be good to go. But always remember that if you are mixing different brands, and sometimes even different product lines, you may need to test them first to make sure they work well together. You can do this by taking each product and adding a little of each product to the back of your hand, and mixing them together. If the product starts to clump or get flakey, they don’t work together. They should be smooth and blend well.
To help create a gradual look, and give the hair a nice flow, use smaller rods on the back of the hair, and roll them at an angle. The closer you get to the front of your head, the bigger your rollers should get, and by the time you get to the front, feel free to use flexi rods.
When twisting the hair, make sure to pay attention to the way you twist it. For example, think about how you would like it to fall when the rods are taken out. The key to a successful rod set, is to add tension to the rods so that the hair is nice and snug. The way it looks before the dyer, is the way it will look once it dries. If you see waves while rolling, there will be waves when it dries.
Once all of your hair has been rolled, sit under a hooded dryer for about an hour and a half. Make sure the hair is completely dry. If you don’t have a hooded dryer, you can use a blow dryer, but it may take longer.
After your hair is completely dry, you can take the rods out and finalize your style, but be mindful of how you take the rods out. Use a tiny bit of wax or butter (non water based), to reduce frizz while separating the curls, in this tutorial, the Loc Butter Lemongrass from DJEA Natural Hair Spa was used. Follow this simple rule when separating the twists: Part the hair, pull it towards you, and lightly twist the section with your finger.
Boom! You have successfully achieved highlights and a rod set. As mentioned, it all starts at the shampoo bowl! Make sure to clean your hair well, take your time to detangle, and let your hair fully dry. After the year we’ve had, we’re all on the lookout for something fresh for 2021, why not start with a bold new color and a rod set!
La Shané is a natural hair, lifestyle, and mental health awareness blogger. As a native Angelino she loves allowing her 4B curls to thrive in the Cali Sun! She’s currently experimenting with water-based hair products and loves sharing her reviews! For more natural hair tips and product reviews, you can follow her @naturalnae_la